


Hi, I'm Kristen's mom - Linda...
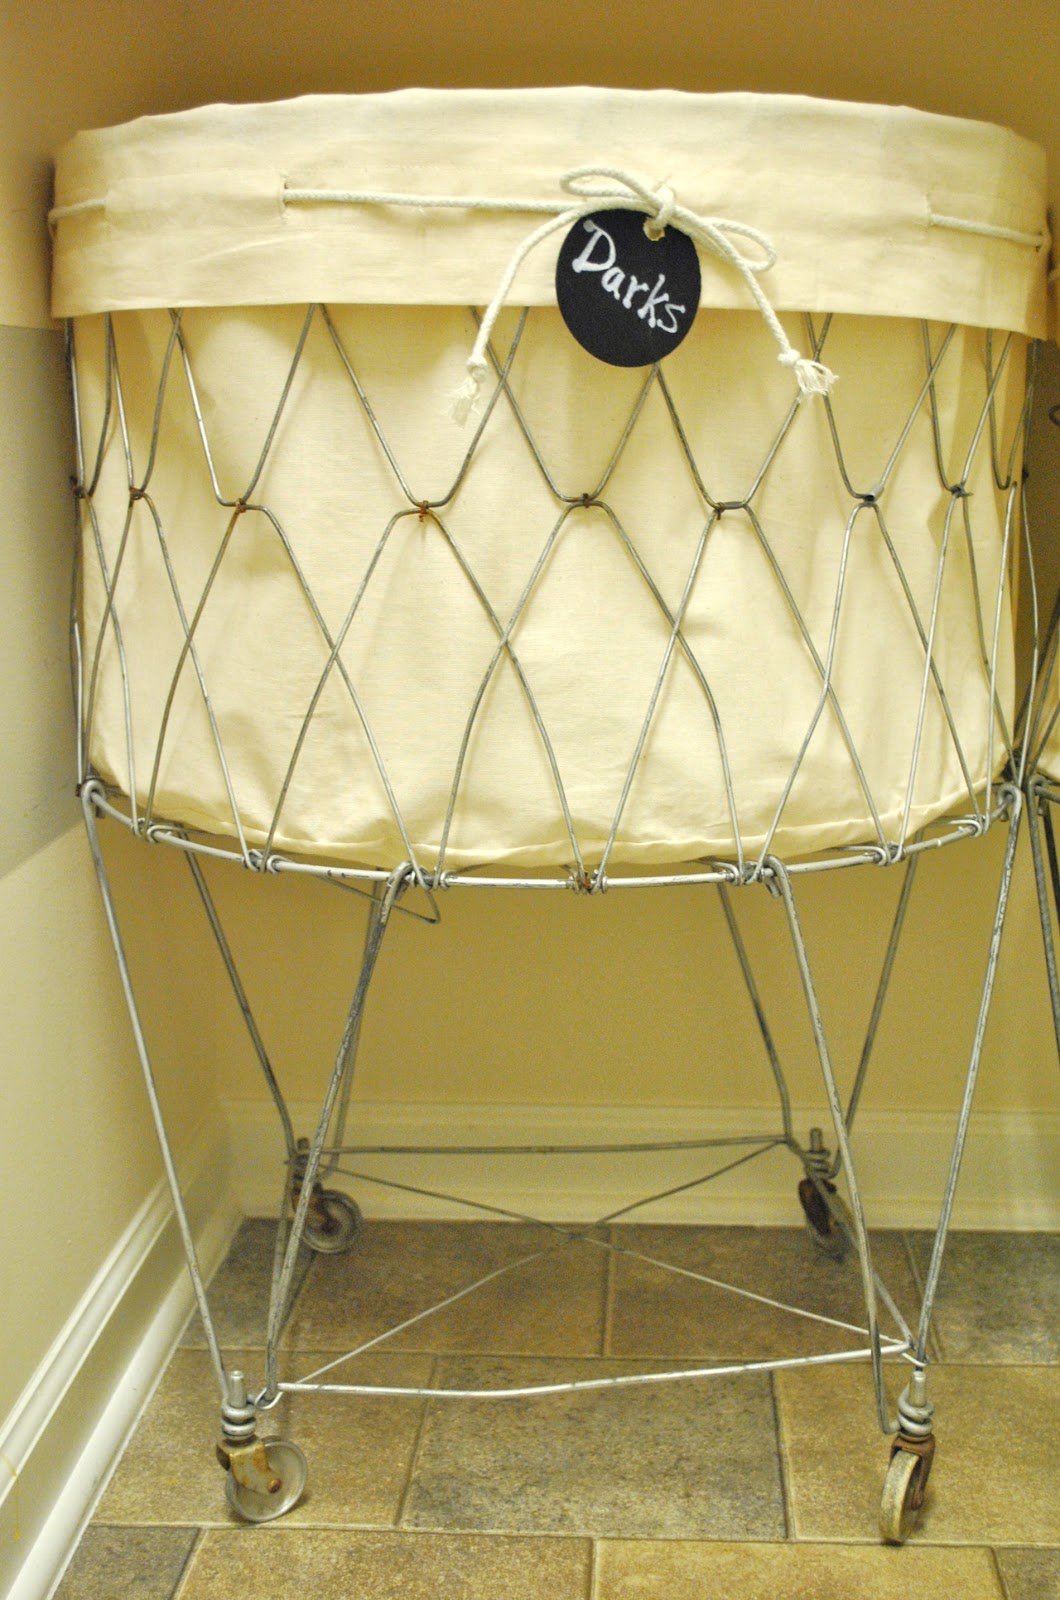
Are you lucky enough to have one of these vintage laundry carts? If it is truly vintage, you probably do not have a fabric liner for it and having a liner can really cute-it-up and can also serve a practical purpose holding laundry.
Are you lucky enough to have one of these vintage laundry carts? If it is truly vintage, you probably do not have a fabric liner for it and having a liner can really cute-it-up and can also serve a practical purpose holding laundry.
Kristen has two carts (little piggy-when we're shopping she always beats me to the good stuff) and recruited me to sew some liners for
her. Since her laundry room has a lot going on, she decided to keep the liner
fabric simple by using unbleached muslin and cording, which are inexpensive supplies.
Let’s Get Started!
Let’s Get Started!

1. Begin by measuring your laundry cart and make a note of these measurements:
- circular diameter of the cart bottom
- circumference of the top of the cart
- height of the cart
2. You can make a pattern for the
circle or try this easy method to make a circle…cut a 24 inch by 24 inch square piece of your
fabric. Fold it in half, then in half again until you have a 12 inch square...

Next, using a ruler, place 0 at the folded corner and pivot from one edge to the other, making an arc that is 11.25 inches long (half of the total 22.5 inch base). I used a pencil to make marks along the arc, then cut along the pencil lines...


Unfold the fabric and you now have a 22.5 inch circle. You will need TWO circles of identical size.
3. The next step is to cut a long rectangular piece of fabric that will form the side of the liner. Using a flexible tape measure, determine the circumference of one of the circular pieces you just made. It is best to measure about ½ inch from the outer, cut edge. Ours measured 69 inches. Add 1 inch for seam allowances for a total of 70 inches.

4. Now use the measurement of the
cart height and add extra inches to fold over the top edge of the cart, like a cuff. Since he
basket of our cart was 13 ½ inches tall, I added 6 ½ inches foldover for a total
of 19 inches. Cut a single thickness rectangular piece of fabric to those
dimensions, i.e. 70''L x 19''H.
5. Seam the short ends of the rectangular piece using half-inch seam allowance. This seam should be "finished" by using a serger, zigzag stitch, or as I did, by sewing a "French seam".
To sew a French seam, place edges wrong side to wrong side and sew a quarter-inch from edge. Then flip the fabric right side to right side, trapping the small seam allowance to the inside, and sew a 3/8 inch seam. This will give you a tight, clean seam that will no ravel.

6. Now sew the liner side to the
circular bottom using a ½ seam allowance...
 When complete, fold the liner side into the middle of the circle and place the remaining fabric circle right side down on top of the squished liner sides. Sew together again, this time leaving an open space of about 6 inches. After stitching, reach inside for the liner side and pull everything right side out. Hand stitch to close the opening.


7. Time to finish the top of the
liner. Place your liner into your cart
and determine how much you wish to fold over the top rim. Fold over 4-6 inches
as preferred, tuck under the edge and sew. (When I was cutting this side piece,
I used the selvage edge so no bottom hem is necessary for a nice finish.) Sew
another line of stitching 1 ½ inches from the hemmed edge.
 8. Now you can get creative. In our
simple design, buttonholes were sewn and cording woven through, ends were tied
and fringed...
8. Now you can get creative. In our
simple design, buttonholes were sewn and cording woven through, ends were tied
and fringed...


You could add metal grommets instead of buttonholes and use
colored cord or ribbon.
Kristen created these chalkboard tags – such a cute
touch!
9 comments:
great tutorial! I made a custom liner for my laundry basket too, although I'd much prefer a vintage one like yours =) ps not sure if it's just my screen, but there's a wonky part in the middle of your post where all the writting is going down vertically on the page.
I love the look of your baskets. Great tutorial. :)
Wonderful tutorial on the laundry basket liners, Kristen's Mom, Linda!!...Kristen is so fortunate to have to close by...you two make a great team!!...I am amazed of the talent of the mother and daughter team..! Love the liner....love the laundry room!
Linda you did a great job on this tutorial...the liners look outstanding. I so understand why you are jealous that Kristen beat you to them (I'm jealous too).
Blessings,
Linda
What a beautiful laundry basket project, Kristen and Linda--it turned out so nice! Well done--I love how it looks!
Great job on the tutorial. Your laundry basket is so cute ...and functional! Stopping by from At The Picket Fence.
Absolutely darling! Love the baskets and the liners! Thanks so much for sharing at Feathered Nest Friday!
Love it thanks so much!!! Have just bought fabric to make the liner.
I love your laundry cart. Thanks for such a great tutorial.
Post a Comment